TEKNIK (GRAFIK) / TECHNIQUE (GRAPHIC) (Tryckbord och Screenram) |
|---|
|
To the right, three views of a pedestal or table that you can place pressure on the table. On top of the pedestal, you will see the actual printing table incl. "vacuum box". The brown cylinder in the picture to the right, select a vacuum cleaner that will be linked to the printing table "vacuum box".
The blue area is the vacuum box. The bright translucent green is the printing table.
In the pictures below I show how to make a printing table
|
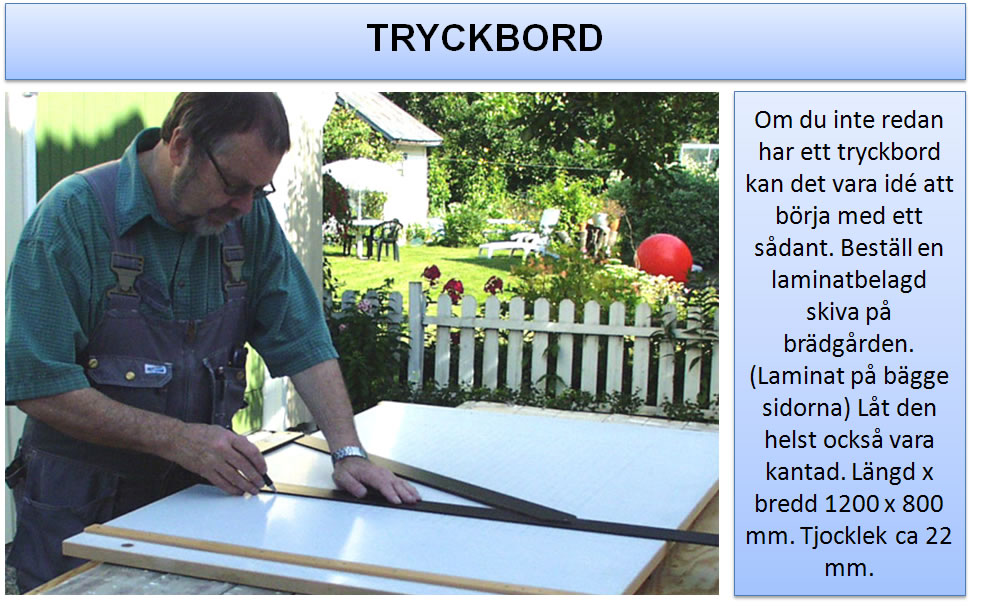
If you do not already have a pressure-table, you might want to start with one. Order a laminate coated disc at the lumberyard. (Laminate on both sides), let the disc preferably also be edged with a protective strip. Length x width 1200 x 800 mm. Thickness of about 22 mm.
|
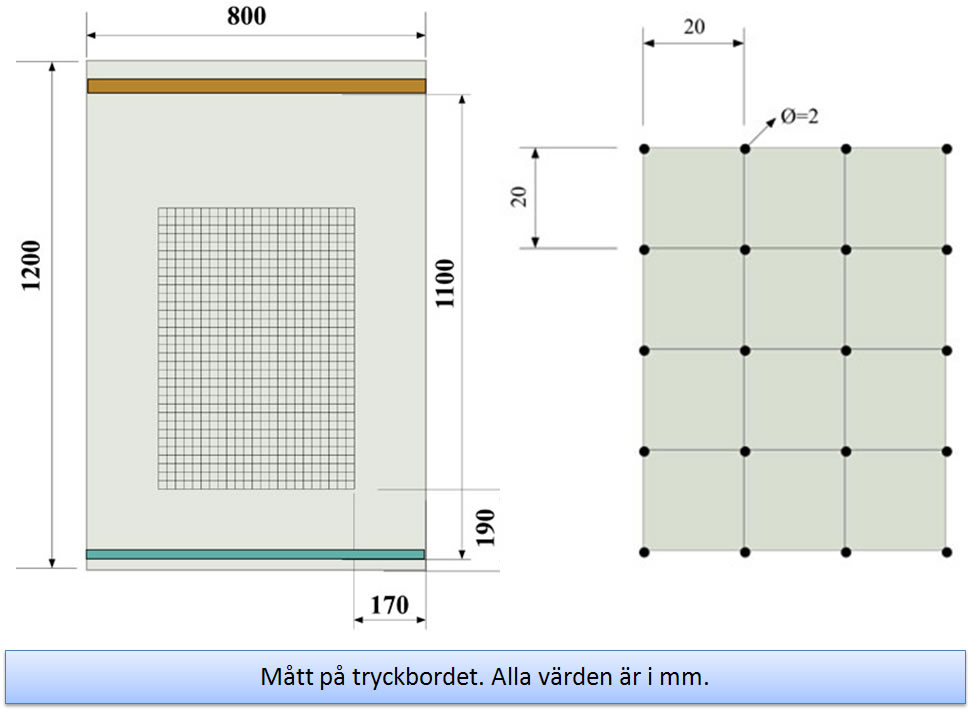
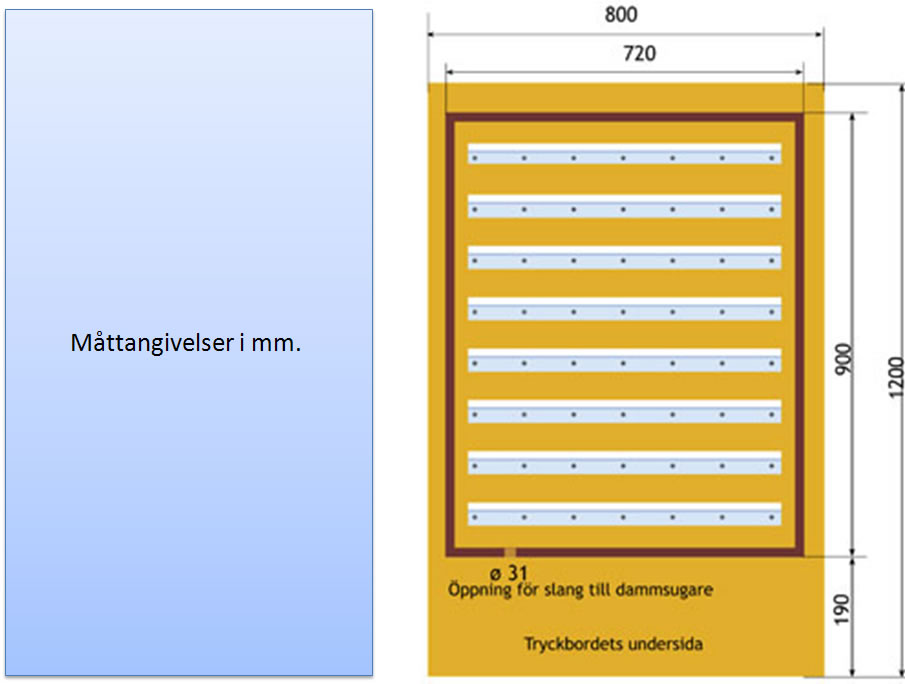
Draw up a 20mm grid on top. 660 x 460 mm wide. Start 170 mm from long edges if you have the width 800 and 190 mm from the bottom short edge.
|
|
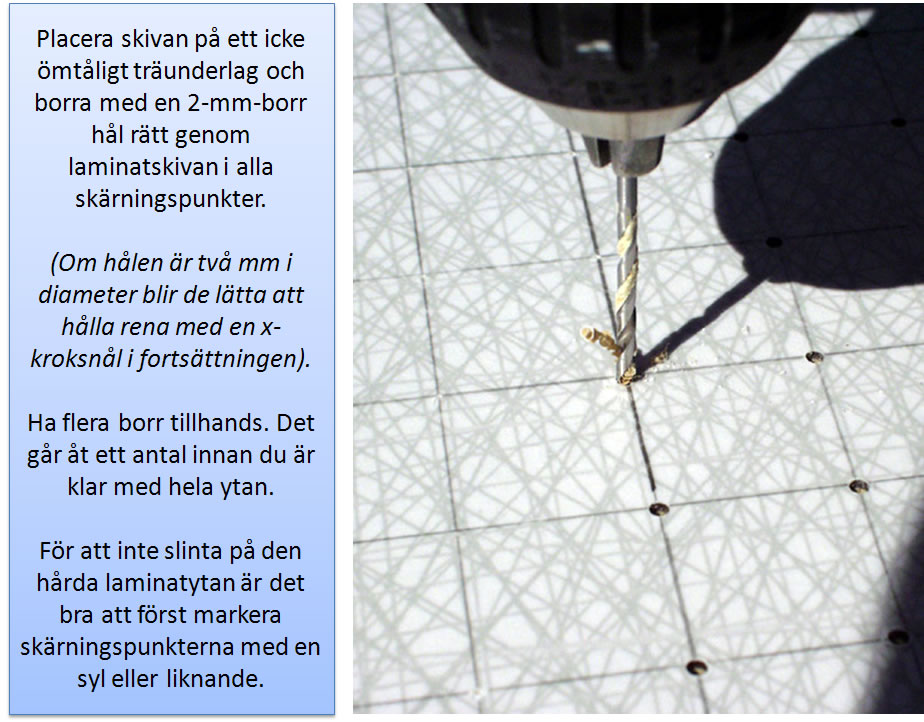
Place the disc on a non-perishable wooden frame and drill with a 2-mm drill holes right through the laminate plate in all points of intersection. (If the holes are two mm in diameter, they are easy to keep clean with an x-hook-efficient in the future).
Have multiple drill ready. It takes a number before you finish the entire surface.
In order not to slip on the hard laminate surface is useful to first highlight the intersections with an awl or similar.
|
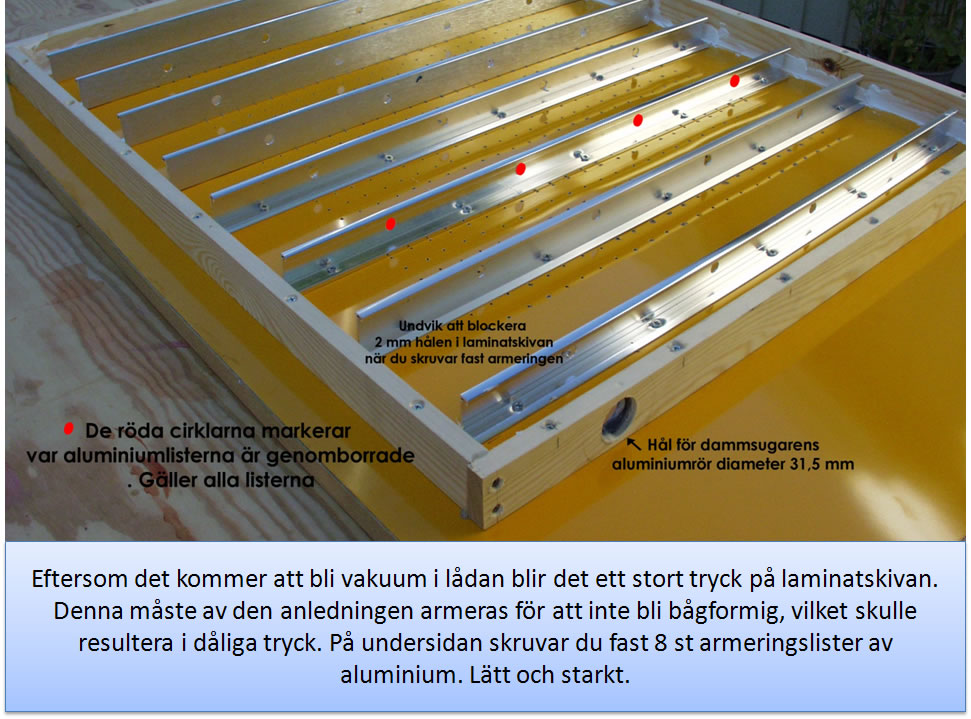
Since there will be vacuum in the box, it will be a big pressure on the laminate disc. This must for that reason be reinforced to avoid being curved, which would result in bad press. On the underside screw the 8 pieces reinforcing strips of aluminum. Lightweight and strong. |
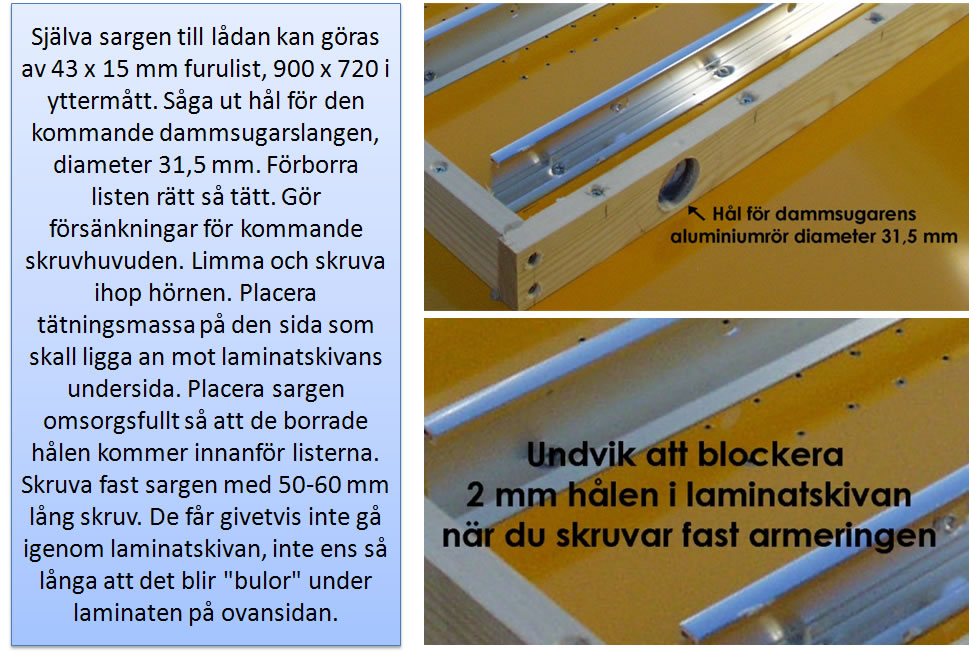
The rim of the box can be made of 43 x 15 mm pine moldings, dimensions 900 x 720 mm. Cut out holes for the next vacuum cleaner hose, diameter 31.5 mm. Drill holes in the strip fairly closely. Make indentations for the next screw heads. Glue and screw the corners. Place sealant on the side that will abut laminate disk. Place the rim thoroughly, so that the drilled holes are inside the bars. Screw the boards 50-60 mm long screw. They may not of course go through the laminate sheet, not even so long that it will be "bumps" during the laminates on the top. |
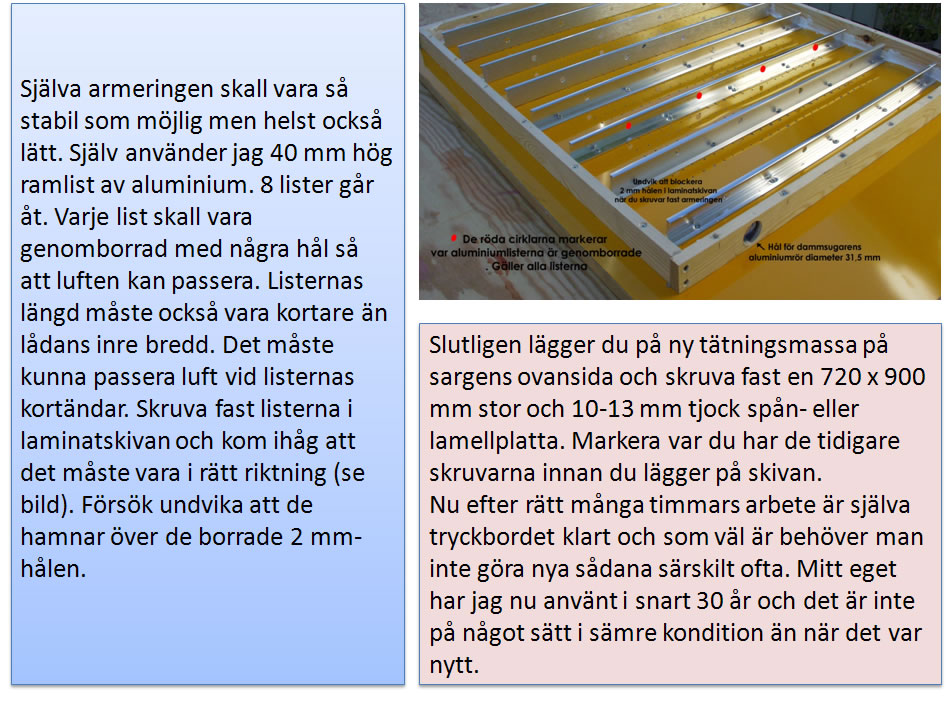
The reinforcement should be as stable as possible, but preferably also easy. I use 40 mm high frame rail of aluminum. 8 strips is spent. Each list shall be pierced with a few holes to allow air to pass through. List The length must also be shorter than the box interior width. Must be able to pass air by edging the short ends. Screw the strips in laminate sheet and remember that it must be in the correct direction (see figure). Try to prevent them from falling over the drilled 2mm holes. Finally, apply the new sealant to the rim top and screw down a 720 x 900 mm high and 10-13 mm thick chipboard or lamella plate. Mark where you've previously screws before you put on the disc. |
|
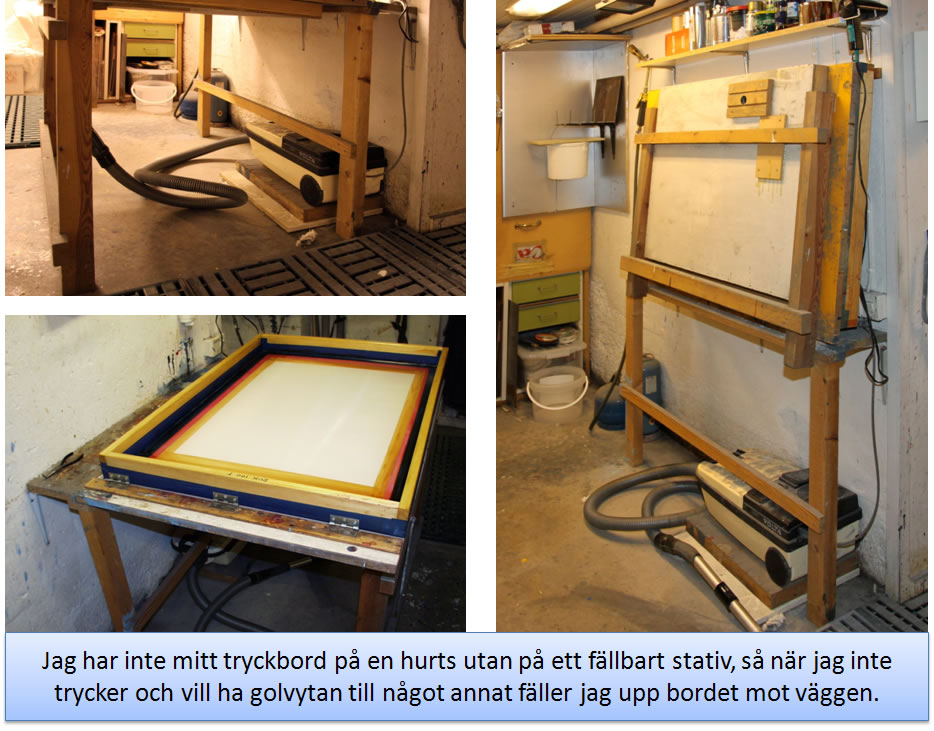
I do not have my press table on a cabinet, but in a folding stand, so when I do not press and want to have the floor space for anything else I shed up the table against the wall. |
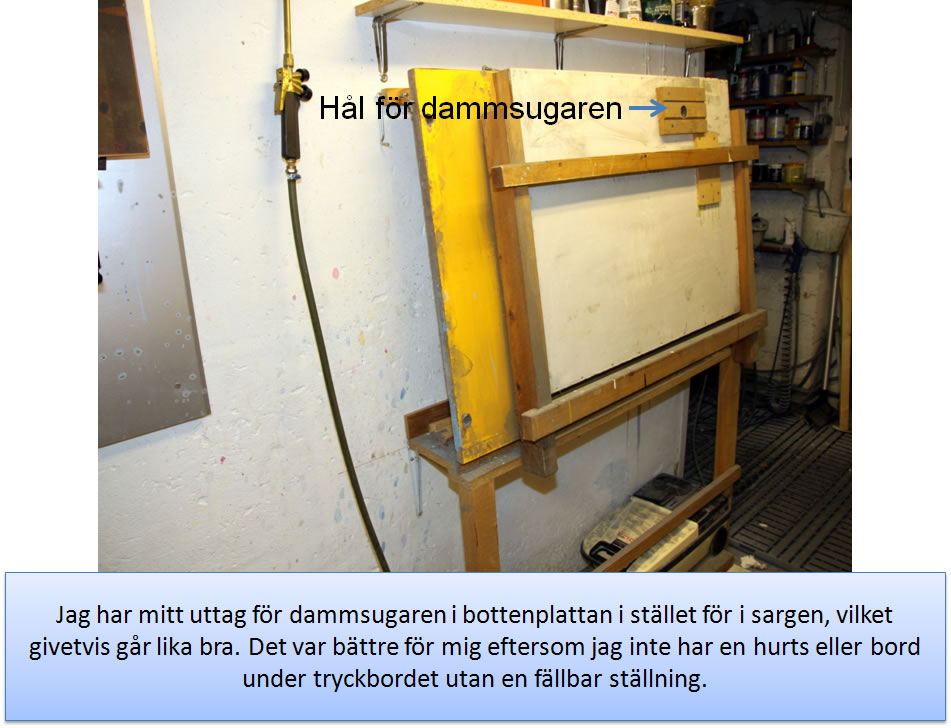
I have my outlet for the vacuum cleaner into the bottom plate instead of in the rim, which of course is just as good. It was better for me because i do not have a pedestal or table under the printing table without a folding position. |
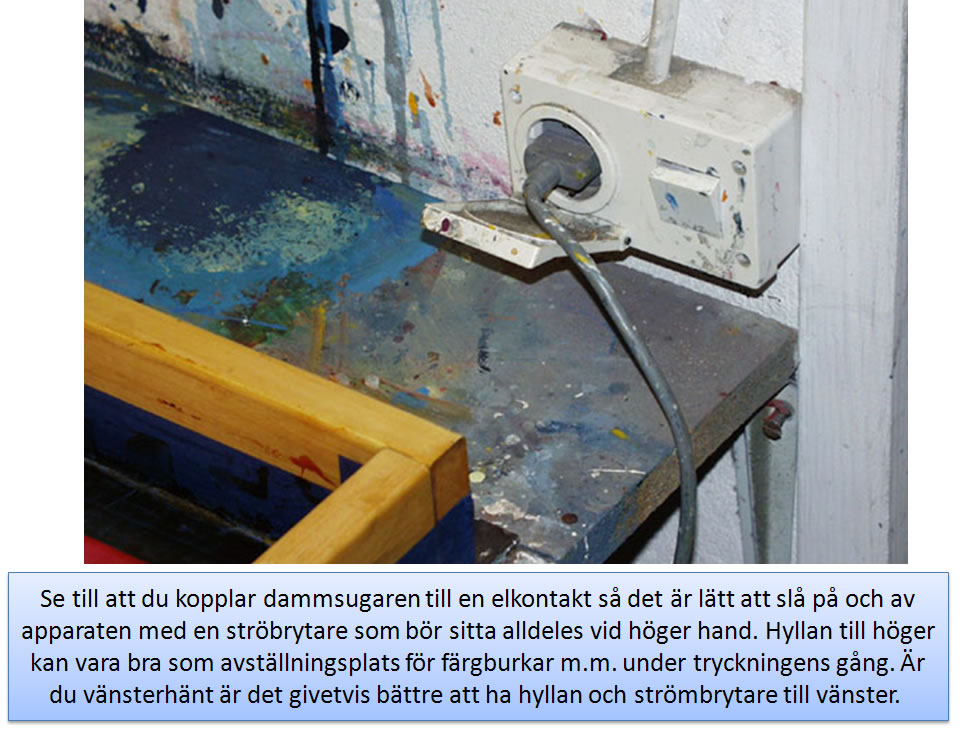
Make sure you unplug the vacuum cleaner to an electrical outlet so it is easy to turn on and off with a sprinkle switch that should sit right by the right hand. The shelf on the right can be good as storage tray for paint cans, etc. during the work. Are you left handed, it is obviously better to have the shelf and switch to the left. |
Now we come to the details that make the next screen frames can be placed right on the printing table. Screw an approximately 40 mm wide and 6-7 mm high strip at the top short edge. The bottom part of the bar shall be 80 mm from the top edge. The strip may well be of a harder wood, oak, for example. It can be made of metal as well, but then you get a little job to drill thirteen holes for future hinges and to attach it to the panel. |
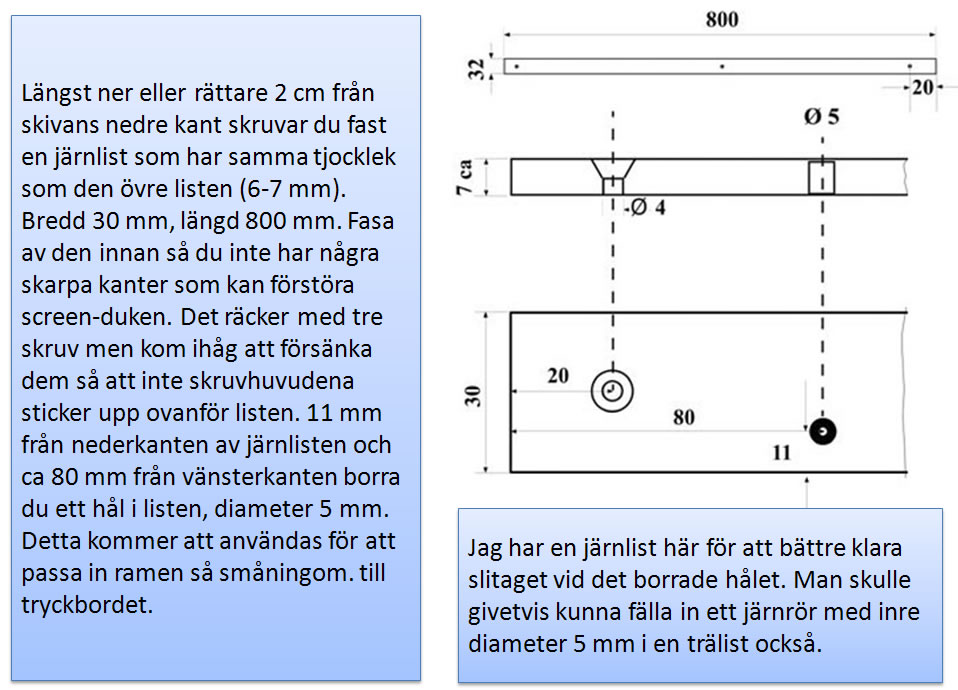
At the bottom, or rather 2 cm from the lower edge of screws you stuck an iron bar that has the same thickness as the upper strip (6-7 mm). Width 30 mm, length 800 mm. Grind it before so you do not have sharp edges that can destroy screen canvas. You only have three screw but remember to countersink them so that the screw heads do not protrude above the bar. 11 mm from the bottom of the iron bar, and about 80 mm from the left side you drill a hole in the bar, diameter 5 mm. This will be used to fit the frame to the print table. I have an iron strip here to better withstand the wear at the drilled hole. One would of course be able to fold into an iron pipe with inner diameter of 5 mm in a wooden strip instead. |
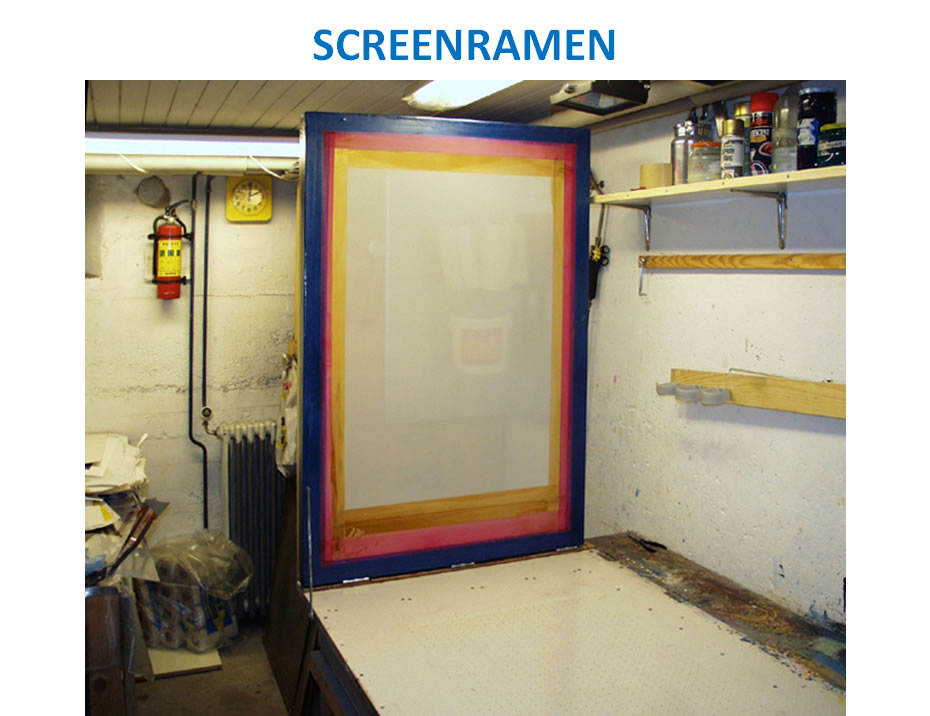
Sreen Frame |
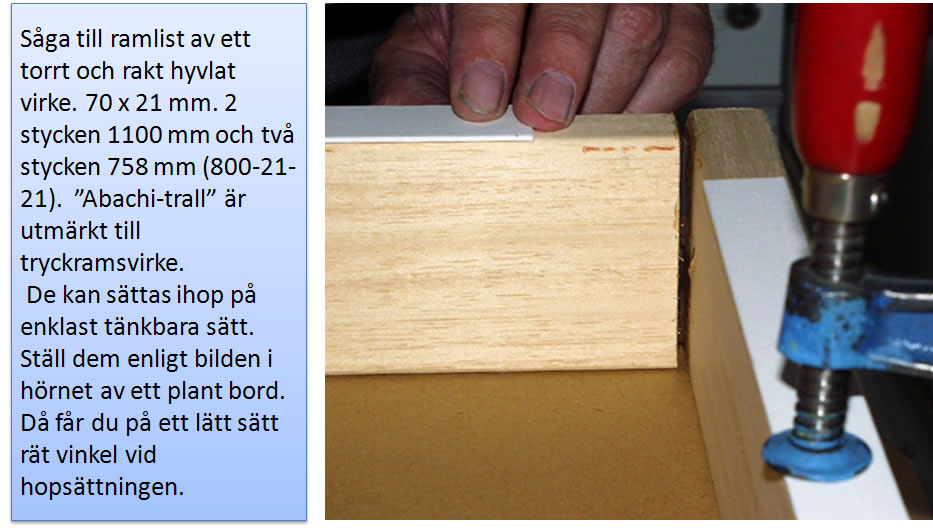
Saw the frame rail of a dry and straight planed. 70 x 21 mm. 2 pieces of 1100 mm and two 758 mm (800-21-21). "Abachi-wood" is excellent to tryckramsvirke. The strips can be put together in the simplest way possible. Set them as shown in the corner of a flat table. This will give you the easy way right angle for reassembly. |
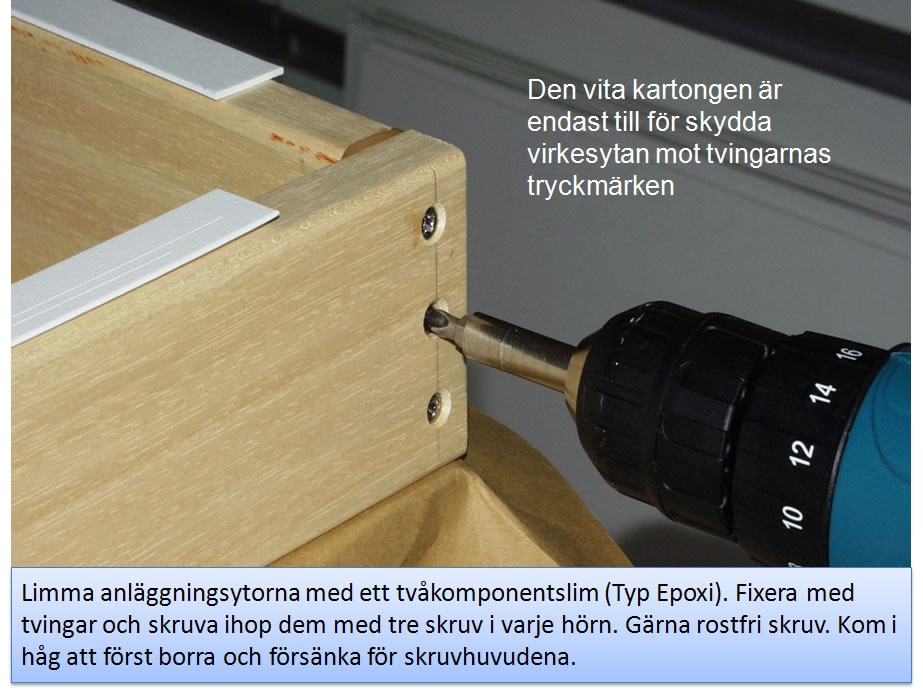
Glue the plant surfaces with a two-component adhesive (epoxy type). Secure with clamp and screw them together with three screws in each corner. Gladly stainless steel screw. Remember that the first drill and countersink the screw heads. |
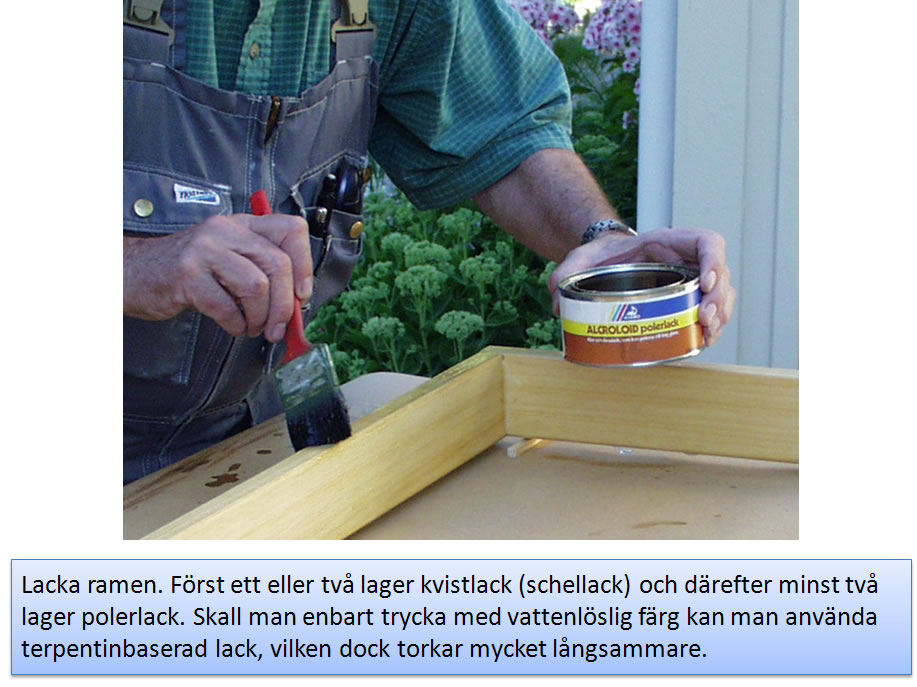
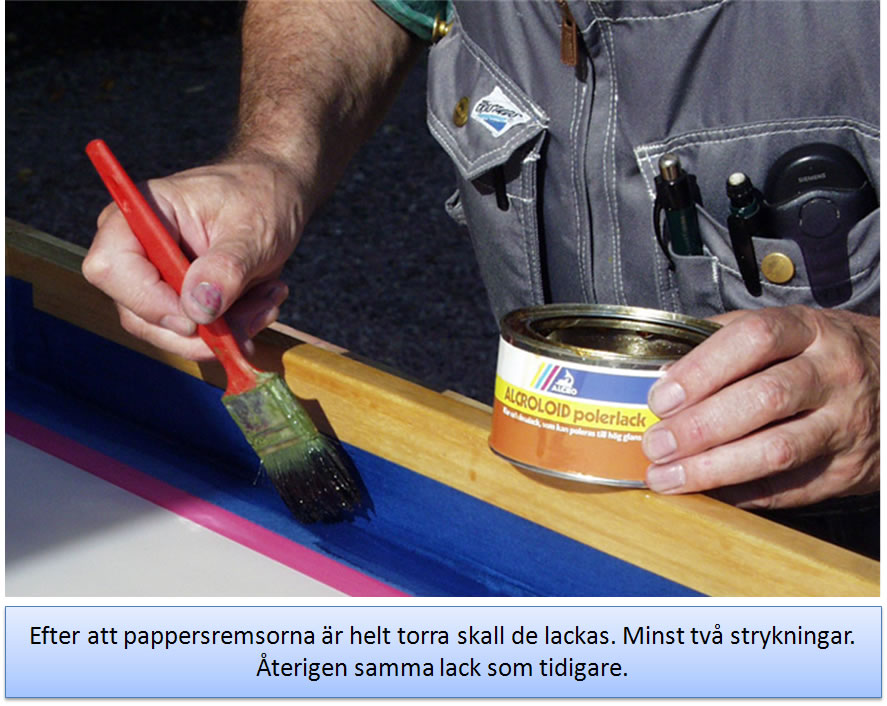
Paint the frame. Only one or two layers twig varnish (shellac) and then at least two layers of polishing lacquer. Should we only print with water-soluble paint, you can use turpentine based paint, which, however, dries very slowly
|
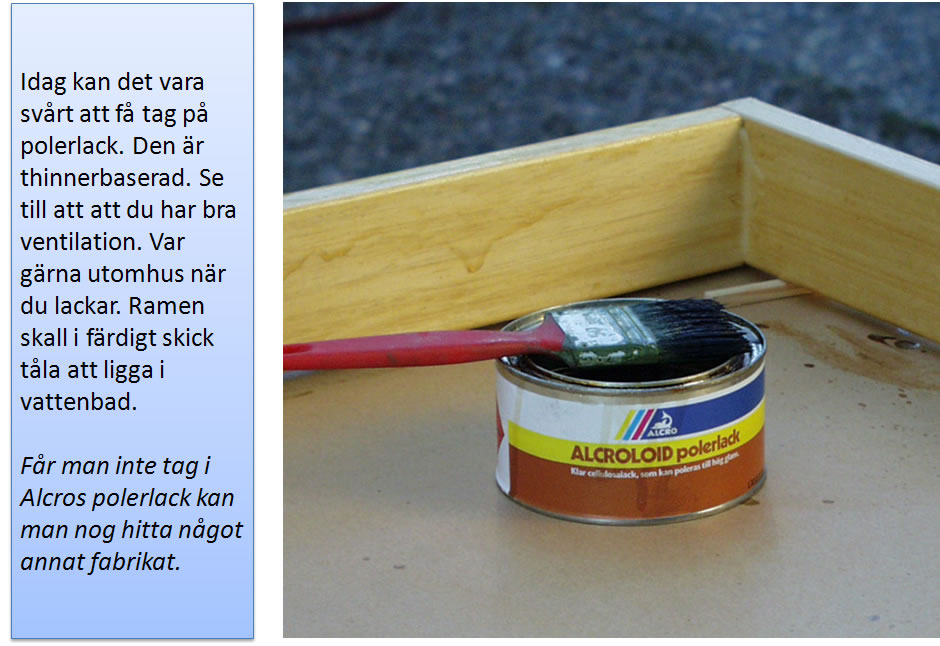
Today, it can be difficult to buy cellulose lacquer. Make sure to have good ventilation. You will ideally be outdoors when you use the paint. The finished frame is to be in the water bath
|
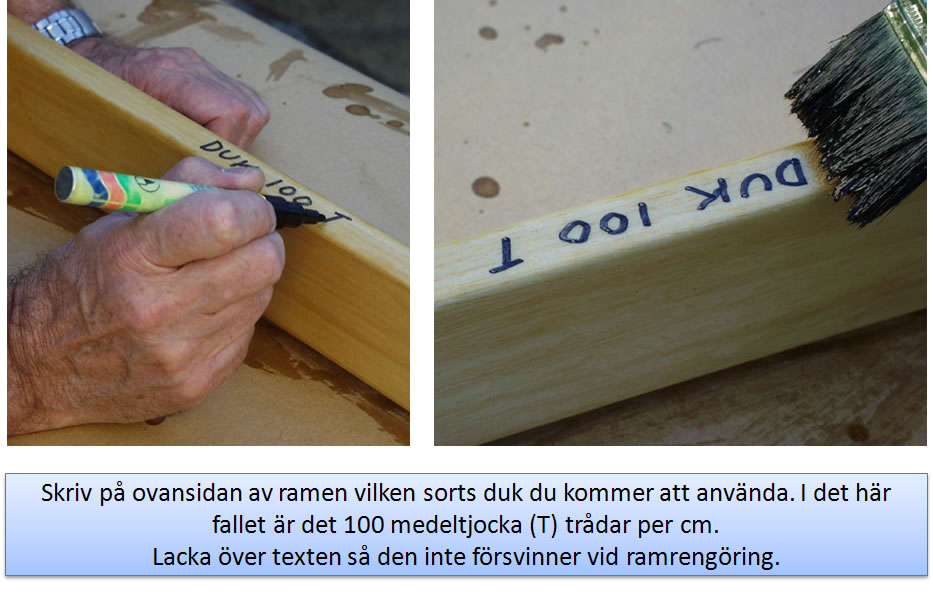
Write on the top of the frame which kind of cloth you will use. In this case, the 100 medium-thick (T) threads per cm.
Lackawanna over the text so it does not disappear when cleaning the frame
|
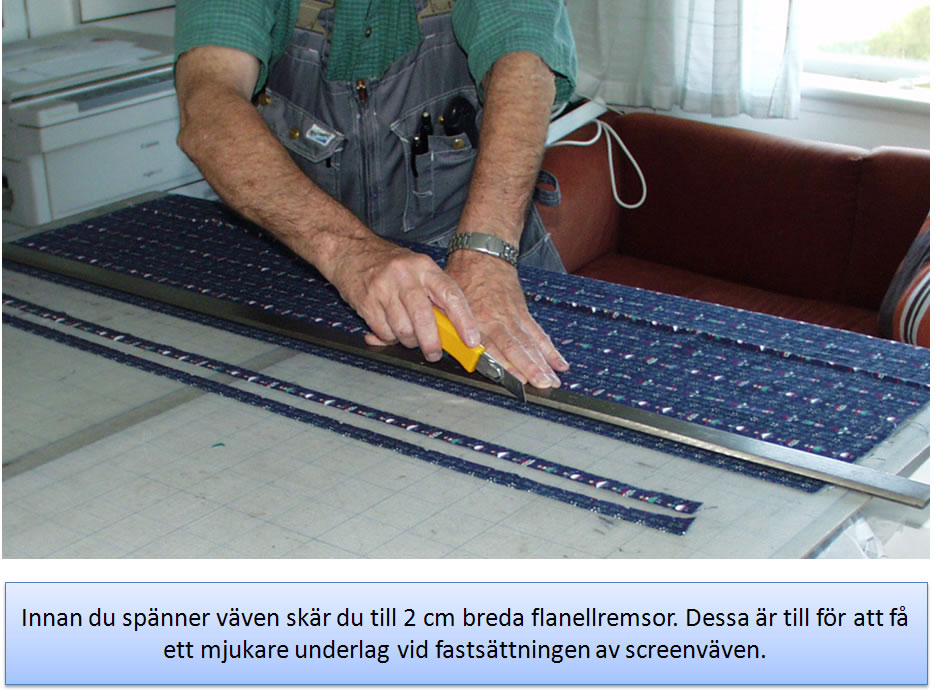
Before you tighten the weave, cut into 2 cm wide strips of flannel. These are designed to give a smoother surface at the attachment of the screen canvas.
|
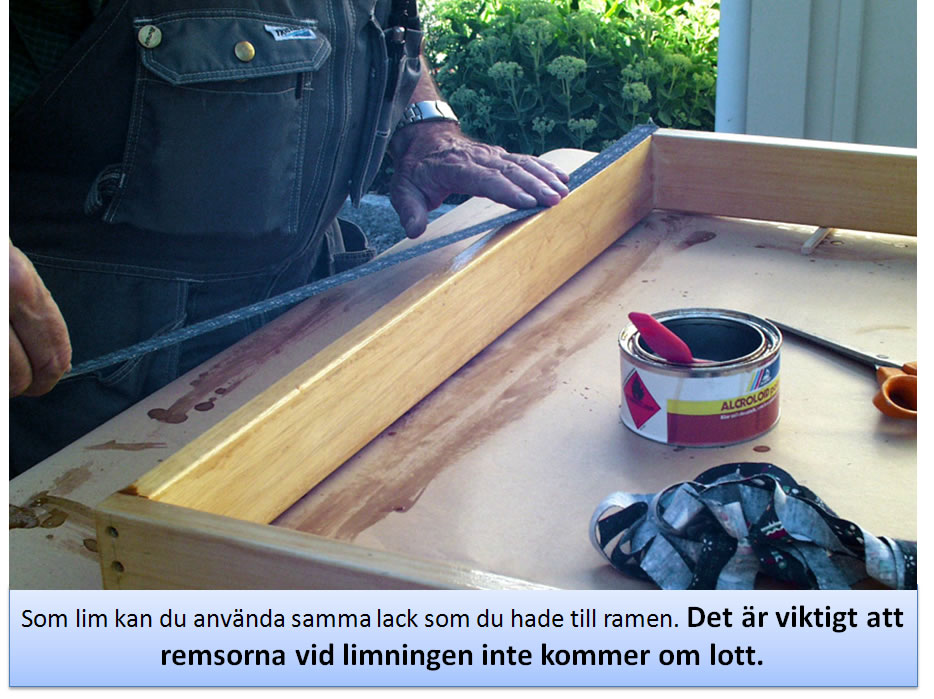
As the glue, you can use the same paint that you had to frame. It is important that the bonding strips will not overlap.
|
Tensioning the screen canvas
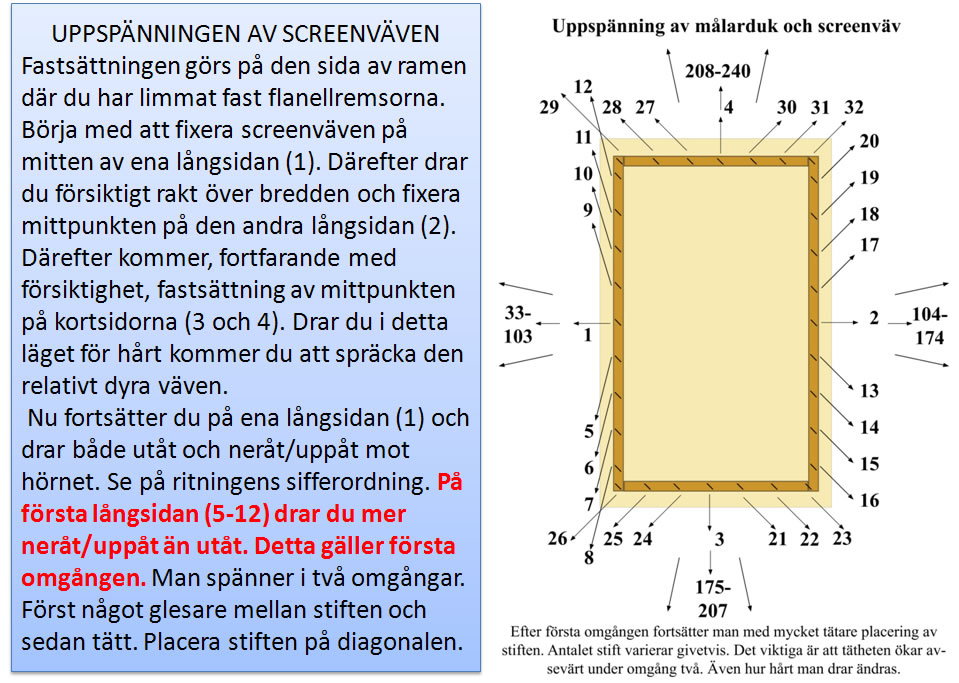
The attachment is made on the side of the frame where you've glued the flannel strips. Begin to fix the screen canvas in the middle of one long side (1). Then gently pull straight across the width and fix the midpoint of the other long side (2). Thereafter, still with care, attachment of the center point of the short sides (3 and 4). Pulls you in this situation too hard, you will crack the relatively expensive canvas? Now, continue on the long side (1) and pull both outward and downward / upward towards the corner. Look at the drawing numerical order. On the first long side (5-12) pull more downward / upward than outward. This is the first round. It spans two rounds. Only somewhat less between the pins and then close. Place the pins on the diagonal. |
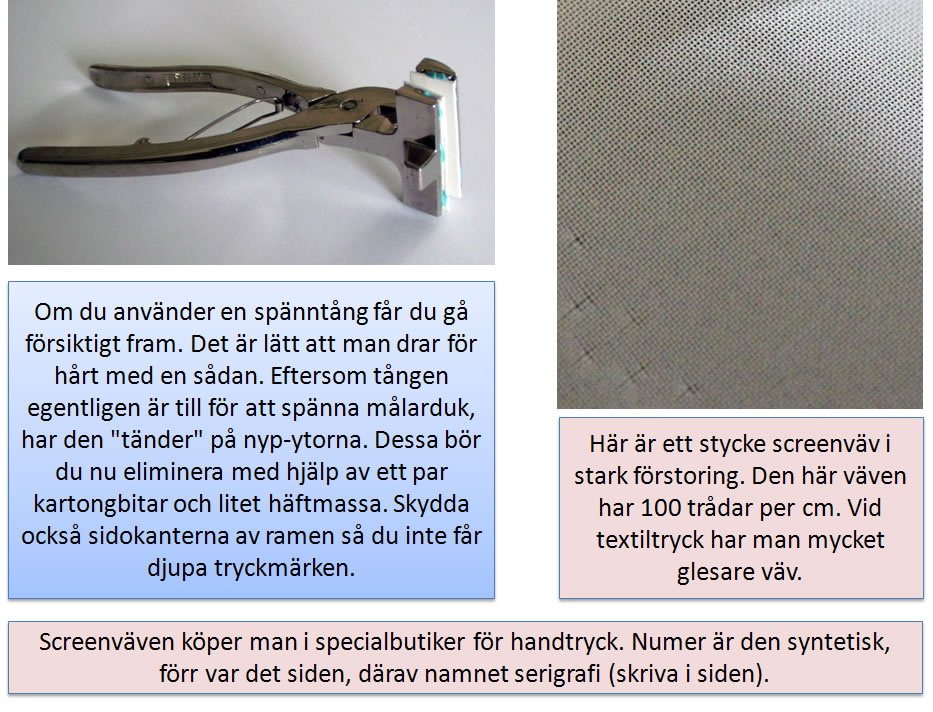
If you use a collet may you proceed carefully. It is easy to pull too hard with one. Because the rod is really to tighten canvas, have the "teeth" on pinch-surfaces. These should now eliminate with the help of a couple of pieces of cardboard and small adhesive. Also, protect the side edges of the frame so you do not get deep pressure marks.
Here is a piece of screen fabric in high magnification. This fabric has 100 threads per cm. At textile printing has been much sparser canvas
Screen wipes purchased in specialty shops by hand pressure. Nowadays, the synthetic, in the old days, it was silk, hence the name serigraphy (silk print).
|
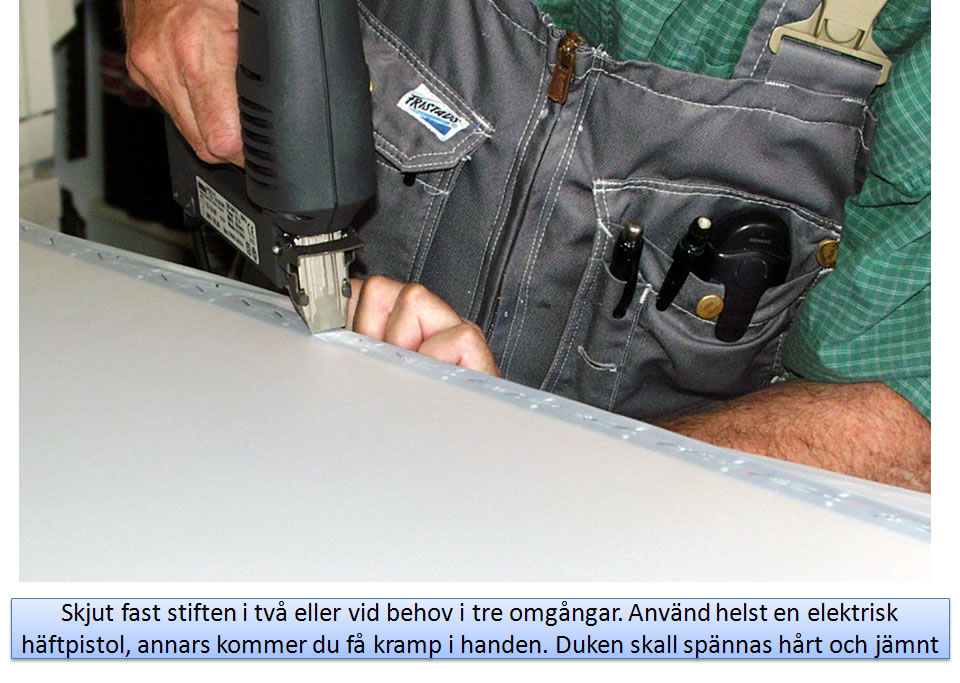
Slide the pins of two or as needed in three installments. Preferably use an electric staple gun, or you will get cramps in your hand. Screen cloth shall be stretched tightly and evenly |
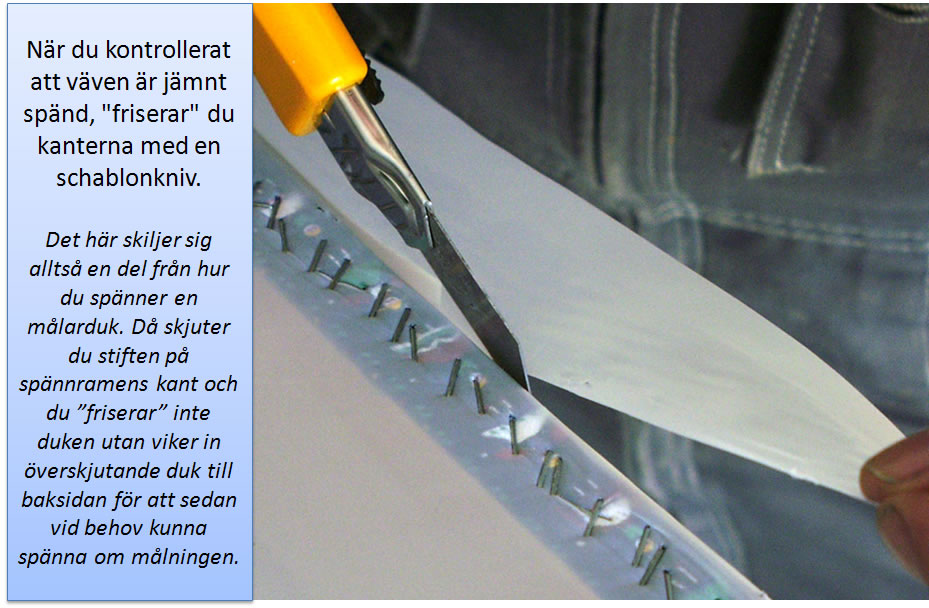
After ensuring that the weave is evenly tensioned, "souped" you edges with a flat knife. |
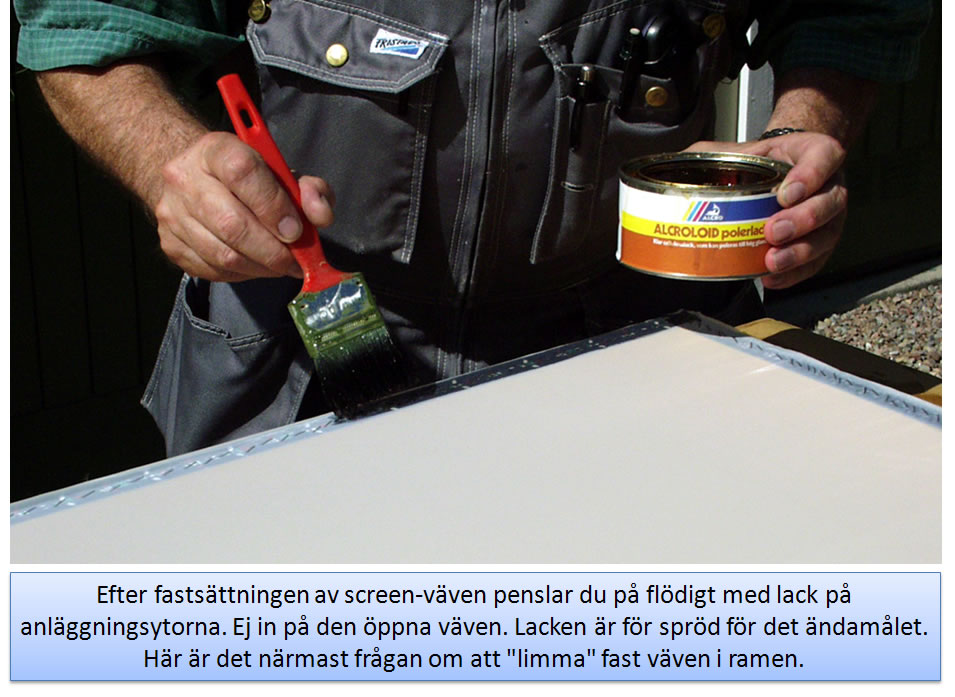
After the attachment of the screen fabric brushes you on thickly with paint on plant surfaces. Not in the open canvas The varnish is too brittle for that purpose. Here are the closest to the issue of the "glue" the fabric in the frame.
|
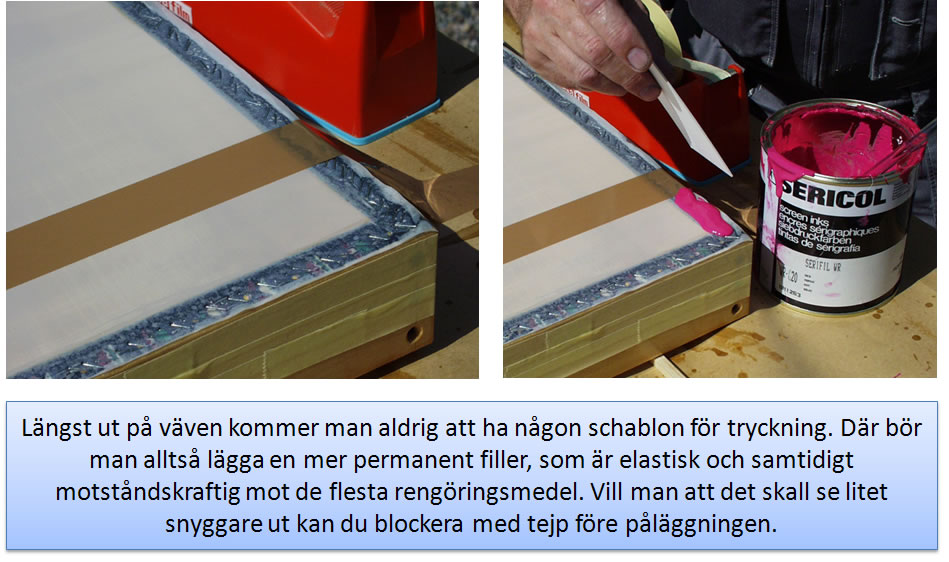
At the tip of the fabric, you will never have any standard of printing. There should thus adding a more permanent filler, which is elastic and simultaneously resistant to most cleaning agents. If you want to make it look a little prettier, you can block with tape prior to application.
|
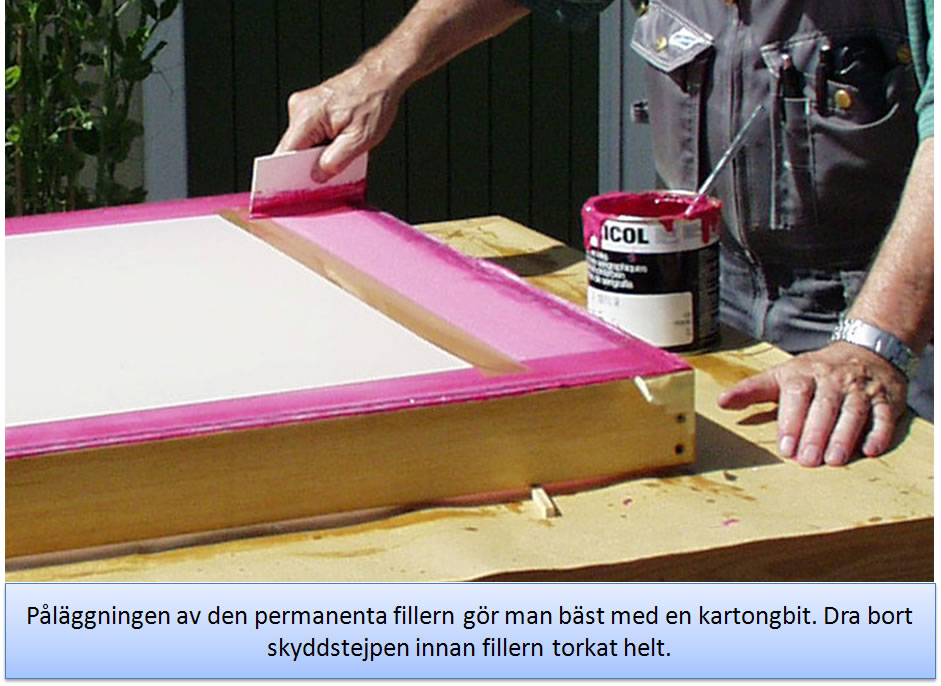
The application of the permanent filler is best done with a piece of cardboard. Pull out the sealing tape before the filler has dried completely |
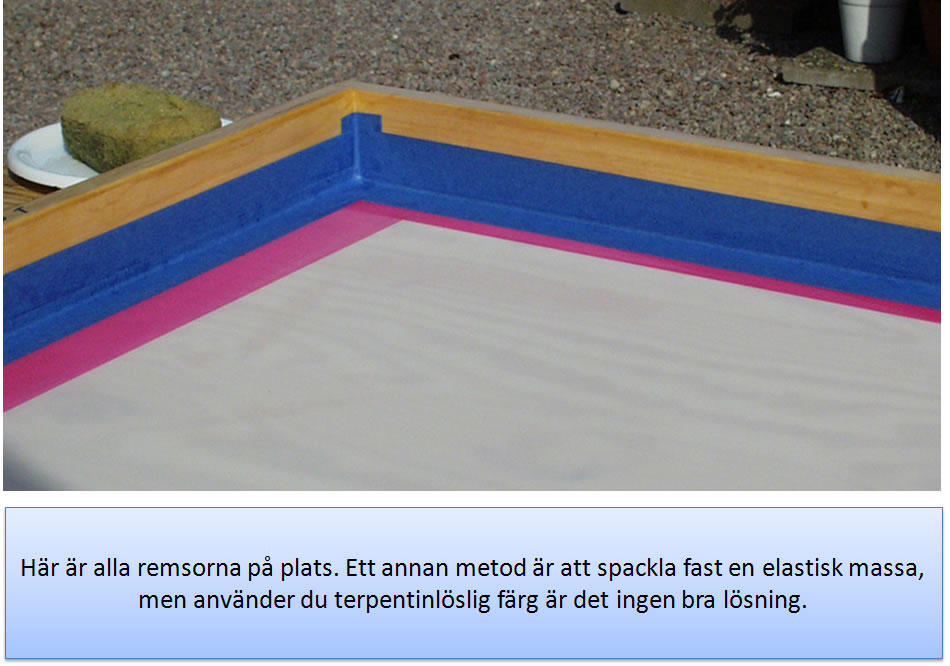
At the far end of the frame, it can feel a little rough and uneven. If you want to get a healer sense when dealing with context, one can draw broader fashioned paper adhesive strips as shown to the right and below. You add only one strip is half the fabric and half the frame's lateral surface. Then on top and then on a side surface. Therefore, it takes three strips for each side.
|
Within the framework, one has to clean the sake of having a smoother transition between the frame and canvas Even here one can have the same strips as above. First, one makes the corners as shown above. Then paste defining the transition between the fabric and the frame (see next slide).
|
|
After the paper strips are completely dry, the varnished. At least two coats. Again, the same paint as before.
|
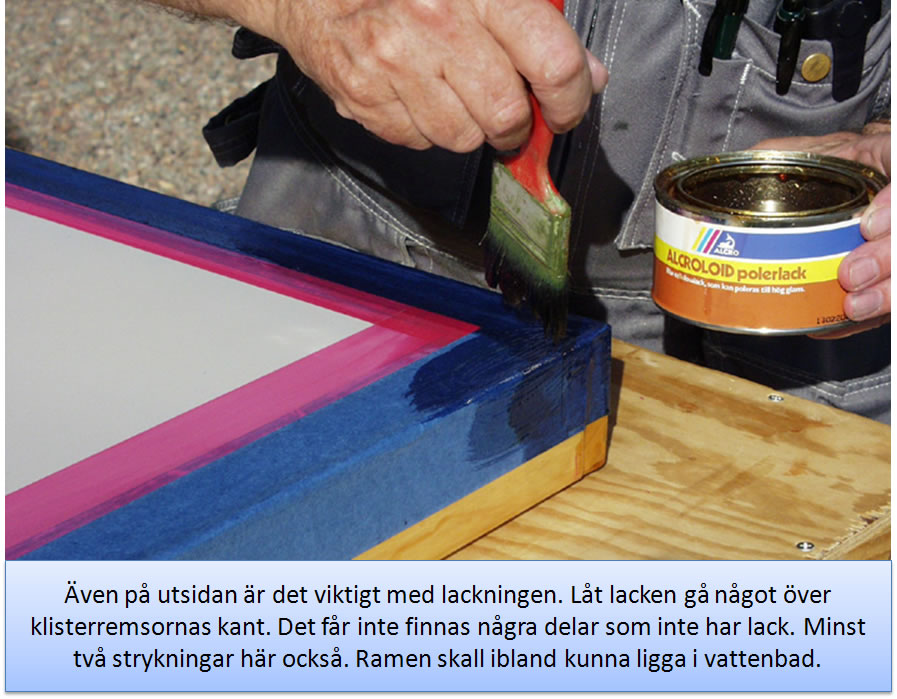
Even on the outside it is important to varnishing. Allow the paint to go slightly over the adhesive strips edge. All parts must be painted. At least two coats here too. The frame will sometimes be able to be in the water bath.
|
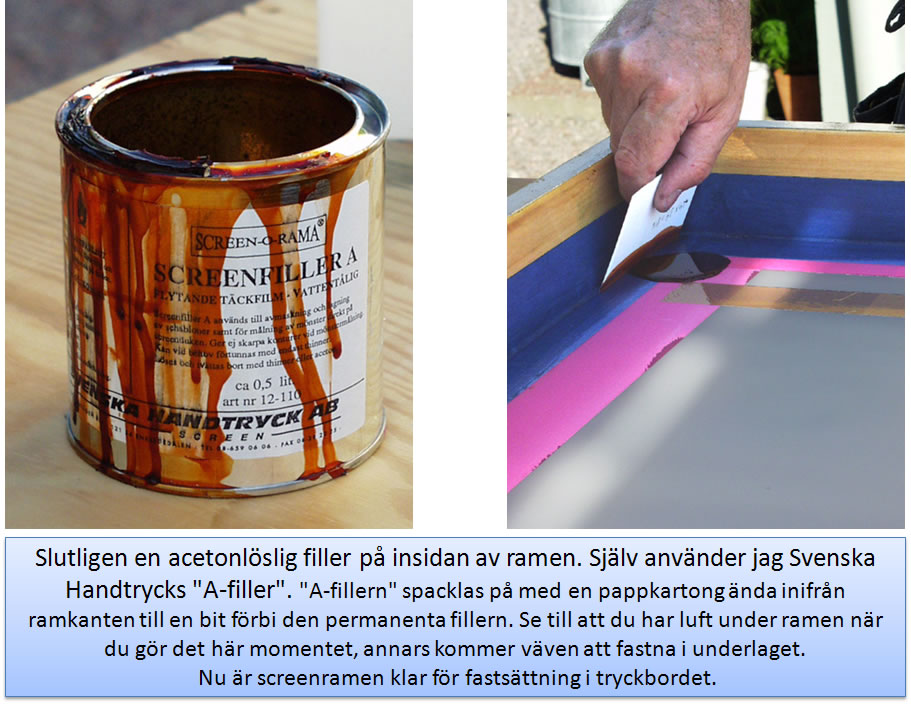
Finally, an acetone-soluble filler on the inside of the frame. I use Swedish Handtryck "A-filler". "A filler" filled in with a cardboard box right inside edge of the frame to a bit past the permanent filler. Make sure you have air under the frame when you do this step, otherwise the fabric to get caught up in the material. Now, the screen frame ready for attachment of the printing table.
|
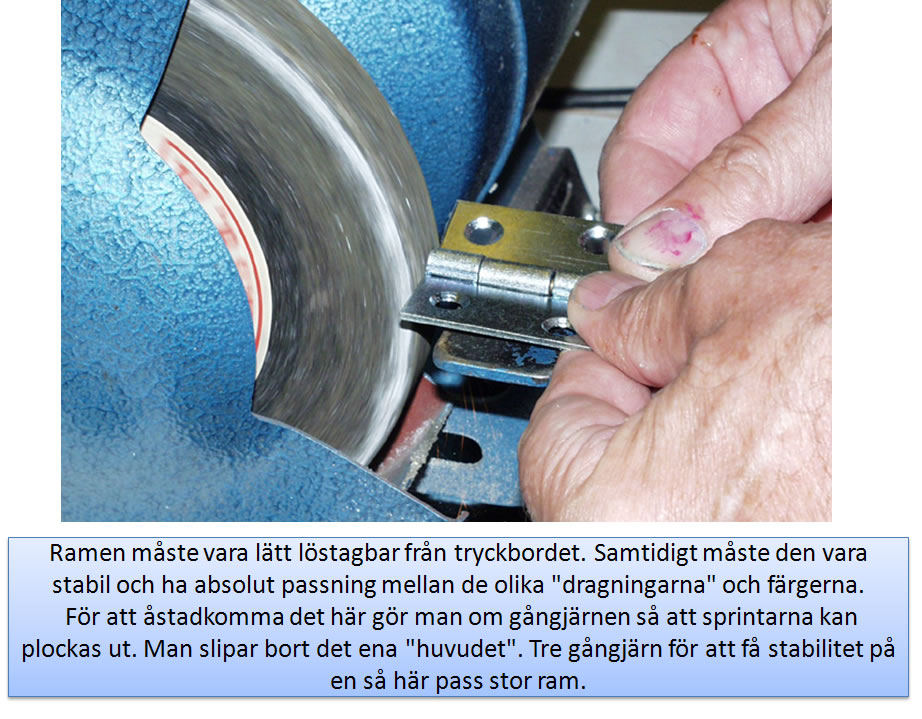
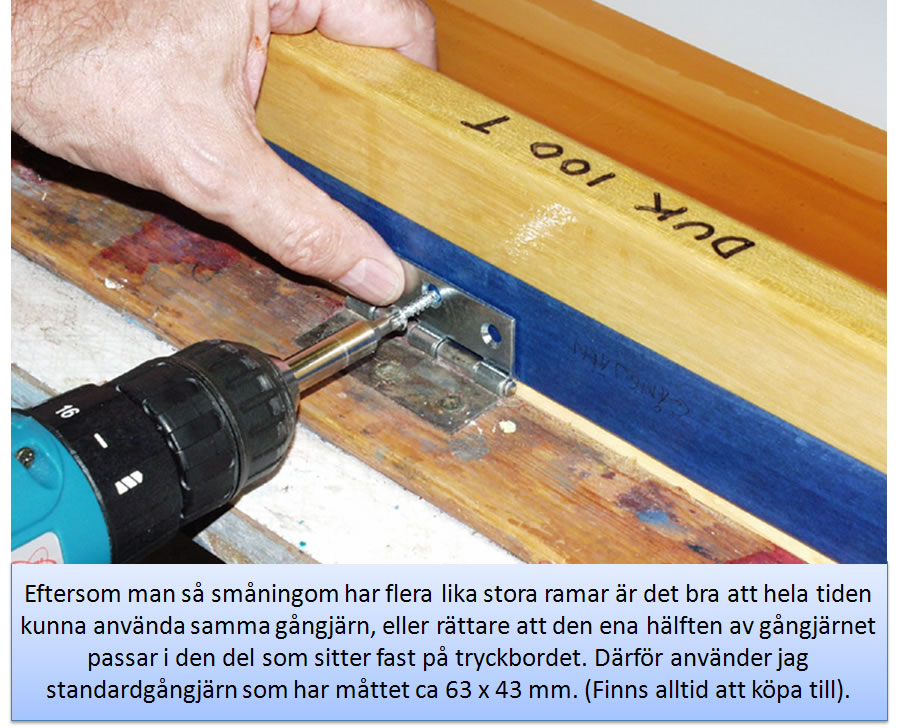
The framework must be easily removable from the printing table. At the same time it must be stable and have absolute fit between the different "spins" and the colors.? To accomplish this do if the hinges so that the pins can be picked out. It grinds away one "head". Three hinges for stability on such a large frame.
|
Because you eventually have several equal frames, it is good to always use the same hinge, or rather to one half of the hinge fits into the part that is attached to the press table. Therefore, I use standard hinges that have measure about 63 x 43 mm. (There are always buying into).
|
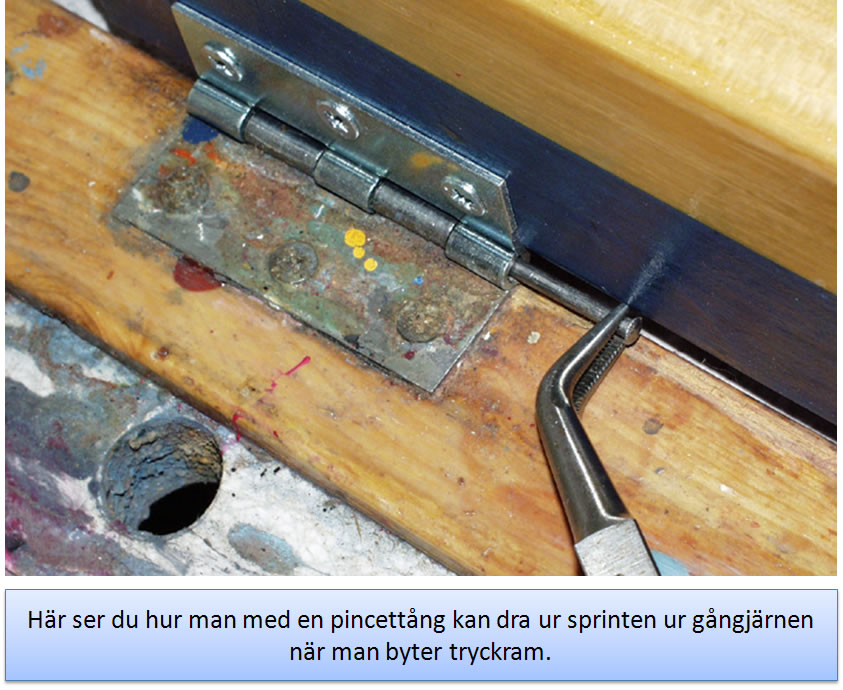
Here you can see how, with a slender forceps can pull the pin from the hinge when changing print frame.
|
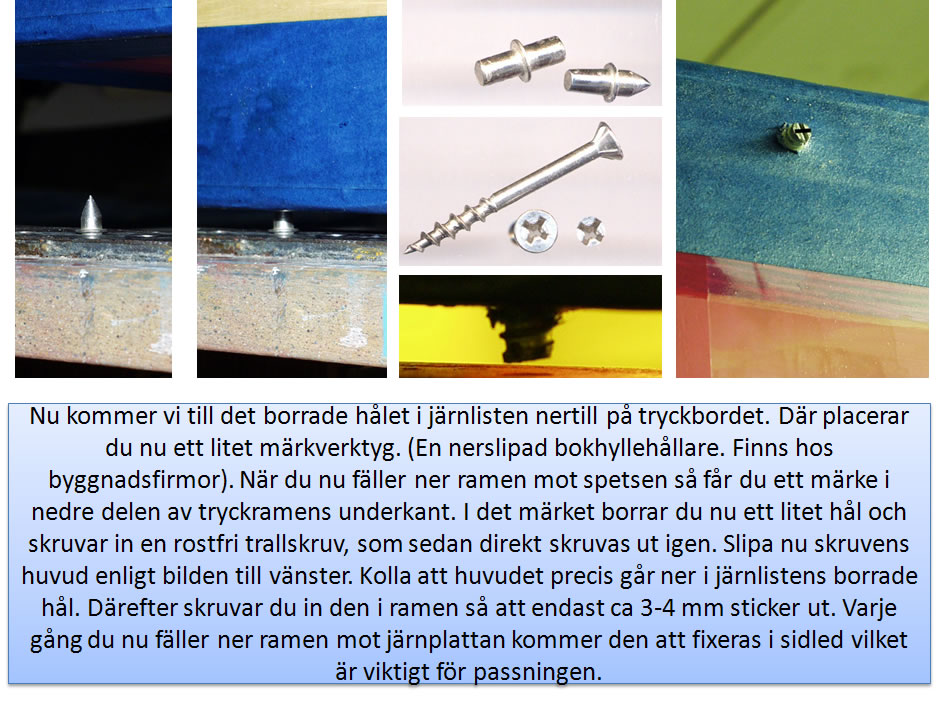
Now we come to the drilled hole in the iron bar at the bottom of the print table. Where the place now a small marking tools. (A tip-shaped bookshelf holder. Available at construction companies). Now when you fold down the frame towards the tip to get a mark in the lower part of tryckramens bottom. The mark, drill now a small hole and screw in a stainless steel decking screws, which then directly screwed out again. Sharpen your screw head as shown on the left. Check that the head just goes down the iron strip drilled holes. Then screw it into the frame so that only about 3-4 mm protruding. Every time you fold down the frame against the iron plate will be pinned which is important for the pass.
|
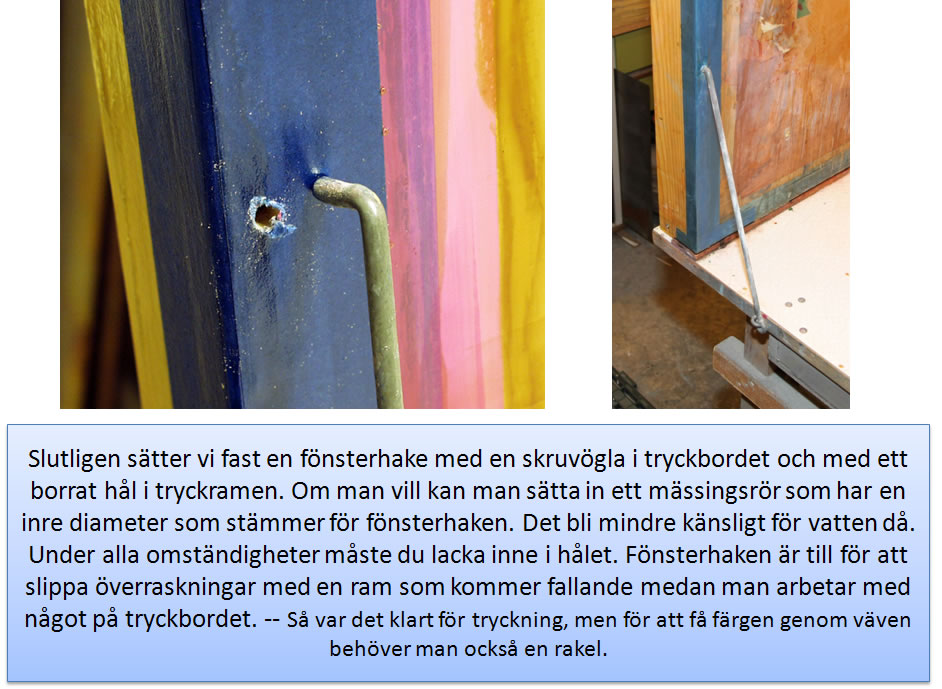
Finally, we put down a window-hook with a screw eye in the printing table and with a drilled hole in the frame. If you want you can insert a tube of brass that has an inside diameter that matches the window latch. It may be less sensitive to water then. In any case, you need to paint the inside of the hole. Window hook is to avoid surprises with a framework that will falling while working on something at the press table. - Now you're done using the equals pressure-table and push the frame to make a picture, but to get the color through the fabric you need also a tool to push the paint through the fabric, a squeegee. |
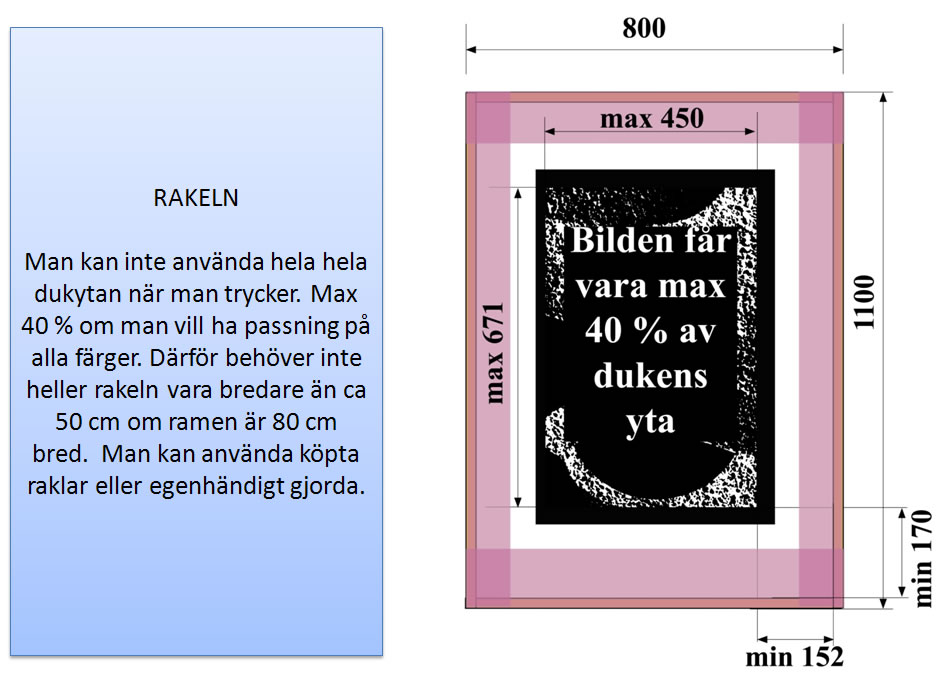
You can not use the whole entire surface of the fabric when pressed. Maximum 40% if you want a pass on all colors. Therefore, neither the squeegee be wider than 50 cm if the frame is 80 cm wide. One can use squeegees bought or self-made.
|
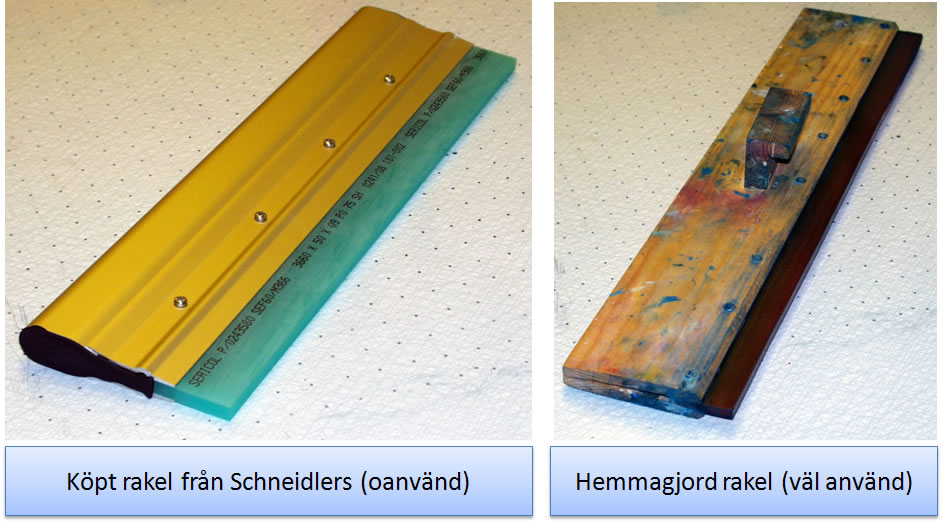
Bought squeegee (unused) to the left and homemade squeegee to the right (use a lot)
|
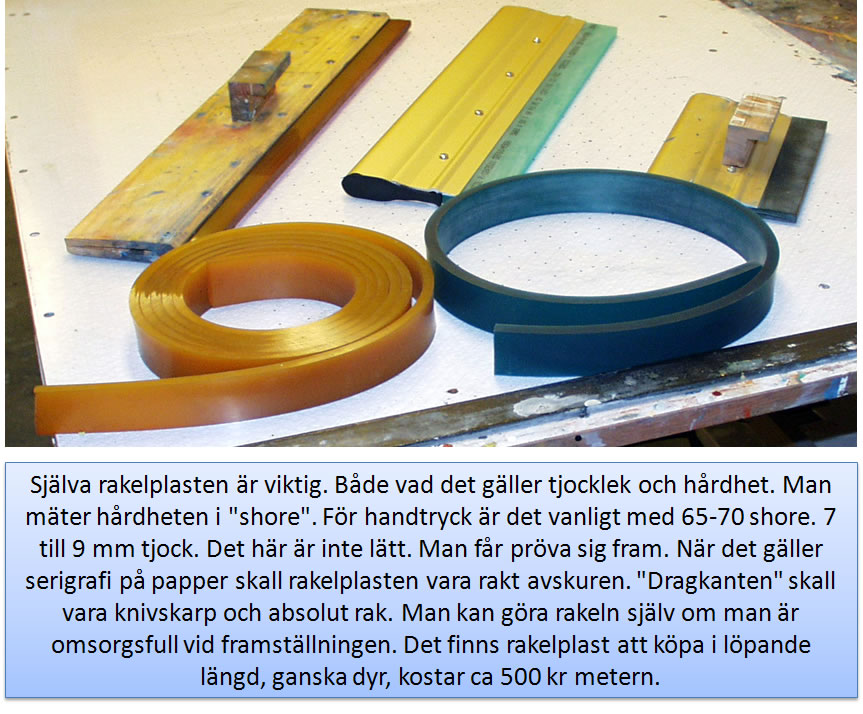
The actual squeegee plastic is important. In terms of both thickness and hardness. Measuring the hardness of the "shore". Hand pressure is usual with 65-70 shore. 7-9 mm thick. This is not easy. One must try it out. When it comes to screen printing on paper, the plastic squeegee be straight cut. "Pull Edge" will be razor sharp and absolutely straight. One can make the squeegee yourself if you are careful in the preparation. There are plastic squeegee to buy at current length, quite expensive, costing around SEK 500 / meter.
|
Regardless of whether you are doing the squeegee yourself or buy a ready-made, it is good to put on a mount. Then you can between each move, hang it on the edge of the frame as shown at right. To take advantage of both "edge" on the plastic squeegee is good if you construct the hanging block so you could easily switch sides on the squeegee.
|
| Tillbaka till grafiska tekniker |